
How to Start a Successful Vlog: The Complete Guide (2026)
Most people who want to start a vlog never actually start. They’re waiting for a better camera, a more polished idea, or a surge of confidence that never quite arrives. Here’s the reality: the creators who succeed don’t start with perfect gear — they start.
Learning how to start a successful vlog is less about equipment and more about making smart decisions early. The right niche, the right platform, one consistent action per week — these are what separate growing channels from abandoned ones.
This guide walks you through everything: from choosing your niche to filming your first video to earning your first dollar, all in a structured 90-Day Vlog Launch Plan.
This guide is for: complete beginners who haven’t published a single video yet.
Table of Contents
What You Need to Know
- Don’t have gear? → A smartphone + a $20 clip-on microphone is enough to start
- Not sure what to vlog about? → Pick one specific topic you already talk about naturally
- Worried about growing? → Consistency (1 video/week) beats 5 videos/week burnout, every time
- Want to earn money early? → Affiliate marketing works at 0 subscribers; the YouTube Partner Program requires 1,000 subs + 4,000 watch hours
- Need a roadmap? → Follow the 90-Day Vlog Launch Plan in Step 6 below
What Is a Vlog?
A vlog (video blog) is a type of content where a creator regularly publishes video updates about their life, expertise, or a specific topic. It works by combining personal storytelling with consistent publishing on platforms like YouTube, TikTok, or Instagram — gradually building an audience that returns for new content.
Recording and uploading a video is not difficult; the essential thing is to highlight the content. To give you an idea, as of 2021 YouTube statistics imply that there are more than 2 billion users, so the amount of content generated daily is practically infinite. Whenever we start a project, we work hard because we believe it will really work and bring us a return. When starting a vlog, you should have the same mindset: it will really succeed.
Vlogs differ from traditional YouTube tutorials or scripted productions. The format is typically conversational, documentary-style, and personality-driven, making authenticity as valuable as production quality.
Vlog vs. Blog: What’s the Difference?
| Format | Medium | Primary Audience Driver | Best For |
|---|---|---|---|
| Blog | Written text | SEO / organic search | In-depth evergreen content |
| Vlog | Video | Platform algorithm + personality | Lifestyle, tutorials, storytelling |
| Both | Written + video | Combined reach | Maximum authority-building |
Many successful content creators run both — but vlogging often builds an emotional connection with audiences faster than written content alone.
Why Vlogging Is Still a Viable Career in 2026
The creator economy continues to grow. YouTube alone processes over 500 hours of video uploaded every minute, yet the demand for authentic, niche-specific content consistently outpaces supply in many categories. Vlogging is viable in 2026 — but only for creators willing to commit to a specific audience and a consistent schedule.
Step-by-Step Guide to Starting a Successful Vlog
Step 1 – Choose Your Niche (Without Overthinking It)
Your niche is the specific topic area your vlog will focus on. It doesn’t have to be unique — it has to be focused.
Choose a niche that sits at the intersection of:
- Something you can talk about for 2+ years without running out of ideas
- Something a specific group of people is actively searching for
- Something where your personal angle or experience adds a layer others can’t easily replicate
Examples of viable niches:
- Budget travel in Southeast Asia (not just “travel”)
- Strength training for women over 40 (not just “fitness”)
- Cooking for one on $50/week (not just “cooking”)
The narrower your niche, the faster you grow. A general “day in my life” vlog competes with millions of channels. A “day in the life of a remote nurse in rural Canada” competes with almost nobody.
Don’t spend more than one week on this decision. Your niche will naturally sharpen after your first 20–30 videos.
Step 2 – Pick Your Platform (YouTube, TikTok, or Both?)
PlatformFormatGrowth SpeedMonetizationBest For
| Platform | Format | Growth speed | Monetization | Best for |
|---|---|---|---|---|
| YouTube | Long-form (8–20 min) | Slow but compound | Ad revenue, YPP, affiliate | Education, tutorials, deep-dive vlogs |
| TikTok | Short-form (15 sec–3 min) | Fast viral potential | TikTok Creator Fund, brand deals | Personality-first, trend-driven content |
| Instagram Reels | Short-form (15 sec–90 sec) | Moderate | Brand deals, affiliate | Lifestyle, fashion, visual-first niches |
Recommended for beginners: Start on YouTube for long-term, compounding growth. Use TikTok or Instagram Reels to post short clips extracted from your main videos — this drives cross-platform discovery without doubling your workload.
Quick Channel Setup Checklist (Optional but Recommended)
Before you upload your first video, set up: – A clear channel name that reflects your niche.
- A simple banner and profile image (you can design these in Canva).
- An “About” section that explains who you are, what you post, and how often.
- A business contact email so brands and collaborators can reach you later.
Step 3 – Set Up Your Equipment (By Budget Level)

You do not need expensive gear. But you do need clear audio. Poor video is forgiven — poor audio causes viewers to leave within seconds.
| Gear Type | Budget Option (<$100) | Mid-Range ($100–$400) | Pro ($400+) |
|---|---|---|---|
| Camera | Smartphone (iPhone/Android) | Sony ZV-1, Canon M50 Mark II | Sony ZV-E10, Canon R50 V |
| Microphone | Rode VideoMicro, Boya M1 lavalier | DJI Mic Mini, Rode Wireless GO II | Rode NT-USB+ |
| Lighting | Natural window light | Ring light (Neewer/Meixitoy) | Elgato Key Light, Aputure panel |
| Stabilization | Prop phone on books | GorillaPod tripod | Gimbal (DJI OM6) |
| Editing | CapCut (free), iMovie (free) | DaVinci Resolve (free, advanced) | Adobe Premiere Pro |
Rule of thumb: Start with what you have. Upgrade one piece of gear every 3 months based on what’s actually limiting your content quality.
Step 4 – Plan and Film Your First Vlog
Don’t just hit record and talk for 15 minutes. A simple structure makes your vlog far easier to edit and more engaging to watch.
Basic vlog structure:
- Hook (0–15 seconds): State what the viewer will get, or tease the most compelling moment
- Introduction (15–60 seconds): Brief context — who you are and what this video is about
- Main content (bulk of the video): A-Roll (you talking) + B-Roll (supplementary footage of what you’re describing)
- Call to action (last 30 seconds): Ask viewers to subscribe, comment, or watch another video
Filming tips:
- Rule of thirds: Place yourself slightly off-center in the frame — it looks more cinematic
- Eye level camera: Position your camera at eye level, never looking down at the lens
- Quiet environment: Bad audio kills engagement faster than bad lighting — record in the quietest space you have
Step 5 – Edit and Publish Your Video
Editing doesn’t need to be complex. For a beginner vlog, focus on:
- Cut dead air and filler words (long pauses, “um”, “uh”).
- Add B-Roll over your A-Roll segments to visually reinforce what you’re saying.
- Captions/subtitles — according to accessibility research, a significant portion of videos are watched without sound, particularly on mobile; captions dramatically improve retention.
- Thumbnail: Design a simple, text-on-face thumbnail using Canva (free). This single element has the highest impact on click-through rate.
Upload with a keyword-rich title (include your main topic naturally), a 100–250 word description with relevant terms, and 3–5 relevant tags.
Note: Use royalty-free music and assets, and avoid filming people who clearly don’t want to be on camera or locations where filming is not allowed. This protects you legally and builds trust with your audience.
Step 6 – The 90-Day Vlog Launch Plan
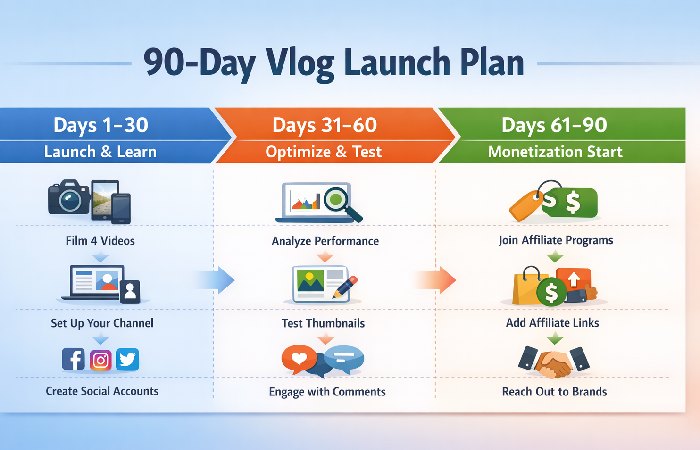
Most vlogs fail not from bad content, but from stopping too early. This plan gives you a structured 90-day runway:
Phase 1 — Days 1–30: Launch and Learn
- Define your niche and ideal viewer persona
- Set up your filming space and basic equipment
- Film and publish 4 videos (1 per week)
- Don’t look at analytics until week 4 — focus on publishing, not obsessing
- Start 3 social media accounts linked to your vlog
Phase 2 — Days 31–60: Optimize and Test
- Identify your best-performing video — replicate that topic angle and format
- Test 2 different thumbnail styles and compare click-through rates
- Improve your intro hook — cut the first 10 seconds down to your most engaging line
- Start engaging: reply to every comment (even if it’s just 2–3 people)
- Publish 4 more videos
Phase 3 — Days 61–90: First Monetization Step
- Apply to 2–3 affiliate programs relevant to your niche (Amazon Associates, ShareASale, or niche-specific programs)
- Add affiliate links to your top 3 video descriptions
- Post one short-form clip (Reel or TikTok) per week from your long-form content
- Reach out to one micro-brand for a potential collaboration or free product review
- Publish 4 more videos (total: 12 videos by Day 90)
By Day 90, you will have 12 published videos, a clear content format, basic monetization set up, and your first real data on what your audience responds to. Most channels that reach this point continue growing — most that stop before it never return.
Essential Vlogging Equipment for Beginners
Camera Options for Every Budget
The best camera for vlogging is the one you’ll actually use consistently.
For absolute beginners: Use your smartphone. Modern iPhones and Android flagships can shoot in 4K with optical image stabilization. Most viewers can’t tell the difference between a $1,200 mirrorless camera and a recent iPhone when content and audio are strong.
For upgraders: The Sony ZV-1 is widely regarded as the best entry-level vlogging camera — compact, flip screen, reliable autofocus, good low-light performance.
The Audio Rule Every Beginner Gets Wrong
Your microphone matters more than your camera. A video shot on a Sony A7 with bad audio will lose viewers faster than a smartphone video with clean audio.
The built-in microphone on any camera or phone picks up room echo, wind, and background noise. For under $25, a clip-on lavalier microphone (like the Boya BY-M1) plugged directly into your phone eliminates 80% of common audio problems.
Lighting Setup Without Breaking the Bank
Natural light from a window is free and flattering. Face the window — never sit with a window behind you (it creates silhouette).
For indoor filming at night: a ring light ($30–$60) provides even, flattering illumination for close-up shots. For wider setups, a softbox LED panel produces more natural-looking light.
Editing Software Comparison
| Software | Cost | Best For | Learning Curve |
|---|---|---|---|
| CapCut | Free | Mobile-first beginners | Low |
| iMovie | Free (Mac/iOS) | Apple users, simple edits | Low |
| DaVinci Resolve | Free (advanced version) | Color grading, pro editing | Medium–High |
| Adobe Premiere Pro | $54.99/month | Full production workflow | High |
| Final Cut Pro | $299 one-time (Mac) | Mac-based pros | Medium |
Recommendation for beginners: Start with CapCut (mobile) or iMovie (desktop). Move to DaVinci Resolve when you’re ready to invest time in learning proper editing.
How to Grow Your Vlog — Platform Strategy and Consistency
How YouTube’s Algorithm Actually Works
YouTube’s algorithm doesn’t primarily favor channel size — it favors viewer satisfaction signals:
- Click-Through Rate (CTR): Does your thumbnail + title make people click?
- Watch Time: Do viewers watch most of your video, or leave after 30 seconds?
- Engagement: Are viewers liking, commenting, and subscribing after watching?
The algorithm tests each new video with a small audience segment first. If your CTR and retention are strong, it expands distribution. This is why the first 48 hours after publishing are critical — promote your video actively in that window.
Using TikTok and Instagram Reels to Accelerate Growth
Short-form platforms can act as a top-of-funnel engine for your main YouTube channel:
- Export a 30–60 second highlight from your YouTube video
- Post it on TikTok or Reels with a caption like “Full video on YouTube — link in bio”
- When a short-form clip goes semi-viral, even a fraction of those viewers will follow to YouTube
This cross-platform approach requires minimal extra effort and doubles your content exposure per video filmed.
Optimizing Thumbnails and Titles for More Clicks
Thumbnail rules that consistently perform:
- Show your face with a clear, expressive reaction
- Use 3–5 words of large, bold text — not full sentences
- High contrast colors (avoid dark backgrounds with dark text)
- One focal point — avoid cluttered, busy designs
Title rules:
- Lead with the most compelling phrase, not your channel name
- Include your primary keyword naturally in the first 5 words when possible
- Use numbers (“5 Mistakes” “90-Day Plan”) — they signal specific, actionable content
How to Monetize a Vlog (Even Before 1,000 Subscribers)
YouTube Partner Program — Eligibility and Timeline
The YouTube Partner Program (YPP) is the primary ad-revenue pathway for vloggers. According to YouTube’s official Partner Program eligibility requirements, you must have:
- 1,000 subscribers
- 4,000 public watch hours in the past 12 months (for long-form content), or 10 million YouTube Shorts views in the past 90 days
YouTube also offers a lower‑threshold path in some regions (starting around 500 subscribers with watch-hour/Shorts‑view requirements) that unlocks limited monetization features such as fan funding and shopping, but the full ad‑revenue route still typically uses the 1,000 subscribers + 4,000 hours or 10M Shorts views criteria.
For most beginners posting weekly, reaching YPP eligibility takes 12–18 months. This is normal — and it’s exactly why diversifying revenue early matters.
Affiliate Marketing for Vloggers
Affiliate marketing is the fastest way to monetize a new vlog — it requires zero minimum subscribers or watch hours. You recommend products relevant to your niche and earn a commission when viewers purchase through your unique tracking link.
How it works:
- Join an affiliate program (Amazon Associates, ShareASale, Impact, or brand-specific programs)
- Get your unique tracking link for a product you genuinely use
- Mention the product naturally in your video and add the link to your description
- Earn a commission (typically 3–20%) on every sale generated through your link
Always follow the FTC guidelines on affiliate disclosure — you must clearly disclose when links are affiliate links. Non-compliance can result in warnings or revenue loss.
Brand Sponsorships and How to Land Your First Deal
Brands don’t always wait for 100K subscribers. Micro-influencers (1,000–10,000 subscribers) with highly engaged, niche audiences often command higher engagement rates than larger accounts, making them attractive to niche brands.
To land your first brand deal:
- Create a one-page media kit (channel stats, audience demographics, content examples)
- Research brands that already sponsor creators in your niche
- Send a concise pitch email: who you are, your audience, and one specific content idea that benefits them
- Offer a free first collaboration in exchange for a product — this builds your portfolio
Common Vlogging Mistakes to Avoid
- Waiting for “perfect” gear before filming — gear paralysis is the #1 reason aspiring vloggers never publish a single video
- Posting inconsistently — the algorithm doesn’t reward random bursts; it rewards regular, predictable publishing
- Neglecting audio quality — even viewers with patience for rough video will abandon a vlog with bad sound within the first 30 seconds
- Ignoring the first 15 seconds — YouTube retention data shows the steepest viewer drop-off happens in the first 15 seconds; a weak intro kills otherwise great content
- Choosing too broad a niche — “lifestyle vlog” competes with millions; “minimalist living in a van in Scandinavia” competes with hundreds
- Never reviewing analytics — after publishing 5–10 videos, your analytics will reveal exactly which topics and formats resonate; ignoring this data is like driving with no map
- Not asking for engagement — viewers who might subscribe often simply forget to unless you ask directly at the end of every video
Who Should Start a Vlog — and Who Should Wait
Best for:
- Aspiring content creators comfortable (or willing to become comfortable) on camera
- Subject matter experts who want to build an audience around their knowledge
- Business owners looking to build brand awareness through video content
- Hobbyists who want to document a journey (fitness, travel, learning a new skill)
Not ideal for:
- People expecting significant income in the first 6 months — vlog growth is a 1–3 year investment
- Anyone unwilling to appear on camera consistently (faceless channels are possible but require significantly more production work)
- Those who want passive income without consistent content creation effort
Final Verdict — How to Start a Successful Vlog
The most important step in learning how to start a successful vlog is making the decision to publish before you feel ready.
Here’s the minimum viable setup:
- Smartphone + clip-on microphone ($20) + window light
- One specific niche you can commit to for 90 days
- One video per week, published consistently
- Affiliate links added to descriptions from Day 1
The creators who win on YouTube and TikTok aren’t the ones who waited for perfect equipment. They’re the ones who started imperfect, stayed consistent, and improved every week.
Follow the 90-Day Vlog Launch Plan above. Publish 12 videos. Review your data. Then scale what’s working.
Frequently Asked Questions
Q: Can I start a vlog with just my smartphone?
A: Yes. Modern smartphones shoot in 4K with stabilization built in — they’re sufficient for months of consistent vlogging. The only immediate upgrade worth making is an external clip-on microphone (under $25), which eliminates the most common beginner audio issue.
Q: How often should I post vlogs as a beginner?
A: Once per week is the optimal starting frequency for most beginners. It’s frequent enough to build algorithm momentum and audience familiarity, but sustainable enough to maintain quality without burning out. Consistency beats volume every time.
Q: How long does it take to grow a successful vlog?
A: Most vloggers start seeing meaningful growth at the 6–12 month mark, assuming weekly uploads. Reaching YouTube Partner Program eligibility (1,000 subscribers + 4,000 watch hours) typically takes 12–18 months for creators in medium-competition niches who post consistently.
Q: How do vloggers make money before 1,000 subscribers?
A: Affiliate marketing is the most accessible early monetization method — it requires no minimum subscriber count. You earn commissions by recommending products in your niche via tracking links in your video descriptions. Brand partnerships and selling digital products (guides, templates, presets) are also viable from a small-audience stage.
Q: What is the most important piece of vlogging equipment?
A: An external microphone. Viewers will watch imperfect video but they won’t stay through bad audio. A clip-on lavalier mic for $20–$30 solves the biggest quality problem beginners face, far more effectively than a camera upgrade.